Training Hex offence with your team
Hex is a new offence which most of your team will not have seen or played before – introducing it can be both fun and exciting, but will certainly come with its challenges. I’ve had experience introducing the offence to a variety of teams and players, from primary schools through University level teams to GB, and along the way have learned plenty about how to make the introduction as enjoyable and productive as possible. I hope to share what I’ve learnt with you in this article.

Before your first session starts some players will be sceptical of the benefits of Hex, some will see no point in learning it, and others will flatly resist change. You can’t always please everybody, but as with any new concept, it’s important to:
- keep things fun
- give players achievable aims
- provide players with challenges
Documentation
The good news is that you can please loads of players! If you direct everybody to the Hex documentation a few days before your first session, you’ll likely get a handful of very keen players excited about learning a new strategy – who will then help the others during the session – making your job much easier. The doc contains the core principles of the offence, which are applicable to players of any level of experience. Memorise the core principles yourself, and repeat them whenever appropriate during training.
From here there are three methods of training Hex offence – explanation, play progression, and drills. There probably won’t be time to run through all three at your first session, so you should choose what to focus on depending on what your team is most receptive to. Different players learn in different ways, so it’s worth running through each method at subsequent sessions so nobody is left behind.
- Explanation – coach explains the positions, principles, and movement of Hex offence, before the players go into a 7v7 game
- Play progression method – players play 2v2, 3v3, 4v4, and 7v7 games (in that order), with coach setting a focus between games to learn the principles one-by-one
- Drills / Exercises – There are a variety of drills which help to reinforce particular key elements of the Hex offence
Positions
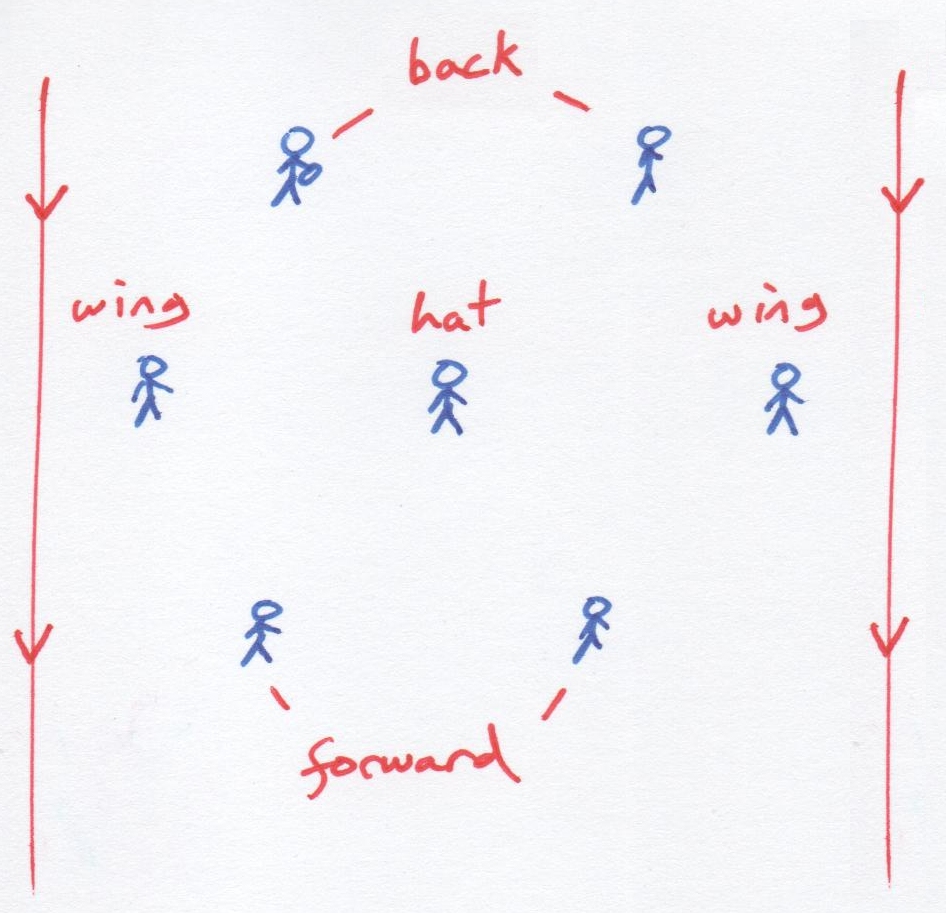
Start with something which everybody can relate to – positions! Mark these out on a mini-field with cones. The basic setup of Hex can be described as 2-3-2. Instead of positions being called handler / cutter / etc, in Hex they are called:
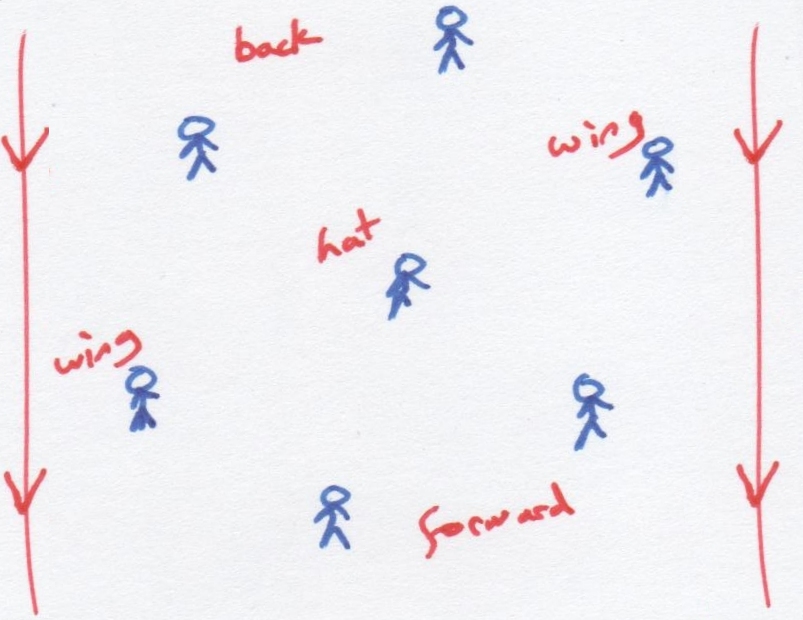 Wing:- the two wing positions are near to the sideline, but should avoid being within 3 yards of it. They stay connected to the players with / behind the disc, whilst making room for the central player, and not getting ‘disconnected’ from the players further forward (you’ll explain what connected/disconnected mean later on). If the disc is near the sideline, the player in possession is in a ‘wing’ position – as if the shape is rotated. In the top right diagram, the disc could be with any of the ‘back’ or ‘wing’ positions, and the setup would be correct.
Back:- these two positions are the closest to our own end zone. Both ‘back’ positions are behind the disc when it is near the sideline, but otherwise the disc is in the hands of one of the ‘back’ players, whilst the the other ‘back’ is roughly level with them.
Hat:- this central position is connected to all the other positions – when the disc is on the sideline the ‘hat’ is level with it, but the closer to the middle of the pitch the disc is, the more directly in front of the disc the ‘hat’ is.
Forward:- these positions are the closest to our opponent’s end zone – both are in front of & connected to the hat and the wing positions, and must avoid getting disconnected (drifting deep) as this takes away the long option.
At this point, explain what you mean by the word ‘connected’ – position a volunteer about 10 yards from you and demonstrate how they can hear your voice, how they’re within easy immediate accurate throwing distance from you, and how they could cut at speed in any direction and receive a pass.
 This distance will vary slightly depending on the size of your players, the average throwing ability of your team, and other factors such as environment.
Demonstrate how if the volunteer is further away from you, they become ‘disconnected’ – it is more difficult to communicate with them, passing to them is more likely to be inaccurate, and if they cut away from you at speed they are harder to hit in stride.
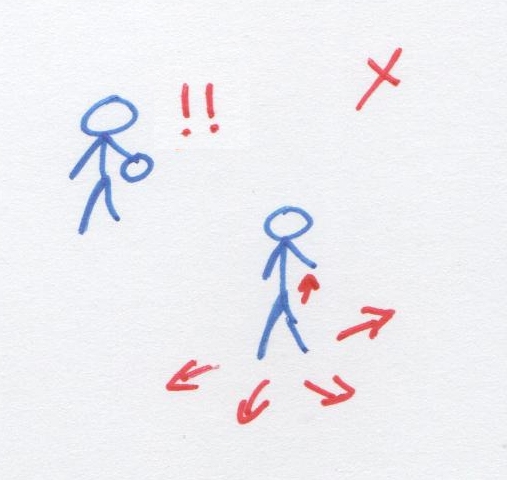 Demonstrate how when a player stands too close, they are ‘crowding’ the thrower – their defender can cause havoc, and they don’t have space to cut towards the thrower for a pass.
Move them out to ~10 yards again and re-iterate that this is the distance you’re talking about when you say two players are ‘connected’. Wherever the disc is on the field, players should look to be staying connected to each other & maintaining the Hex shape.
Movement
How movement is conducted in Hex is dependant upon the style in which you want to play. The style I teach is based around freedom, fast disc movement, and intelligent innovation by the players. Other teams have had success with more pattern/play-based movements from the Hex setup, or approaches where players switch positions infrequently. Below I explain how to teach the ‘Mexican’ style of the offence which is played by the teams I have coached, and which I believe is particularly suited to the Hex setup.
Immediately clarify – after explaining positions – that there are no set ‘roles’ for a point. You may start a point as a ‘forward’, and within 5 seconds of team possession you could be in a ‘back’ position, and vice versa. The positions laid out and explained are all filled dynamically, and every player is encouraged to occupy whichever position is appropriate at any given time. Movement occurs when players are aware that positions are unoccupied, and move quickly to occupy them. When you cut, you are often moving into a valid position as well as creating space where your cut originated, so there is no assumption that you need to ‘clear’ back to your original position.
Initial movement is based upon the ‘take what they give you’ principle – both as a thrower, an intended target, and a team mate – awareness of what the defence is allowing your offence, and how to work effectively as a team to highlight and isolate that option – dictates how movement occurs from a static position. The #1 principle is to take the open pass – regardless of yardage / field position / stall count.
Players can simply play as they would when in flow in any other offence – cutting into space as they see it appearing, passing to whoever is free, and creating space for team mates.
GB Mixed U23 2015 (Black) playing Hex vs GB Mixed 2015 (White) [no animation? refresh page]
A couple of players may feel baffled, which is understandable, so give them a final piece advice that they can use whenever they are in doubt: Make triangles.
 Set out another ‘connected’ volunteer, and ask a third player get into a position where they are ‘connected’ to both of you – they should make an equilateral triangle. If you’re lost on the field, all you need to do is find two team mates and get connected to both of them without crowding – this will likely put you in a good position.
Enough talking! It’s time to start playing. Take any questions people have and then get everyone on the field ready to play.
Try to keep chat on the line down to a minimum for at least the first 3-4 points, and encourage players to learn by playing & trying to get involved. Keep the core principles in mind when looking to advise from the sideline.
As the game develops, if you notice players setting up incorrectly from static – you should interrupt the game and reposition them as appropriate (often when the disc is on the sideline).
Some common scenarios which occur:
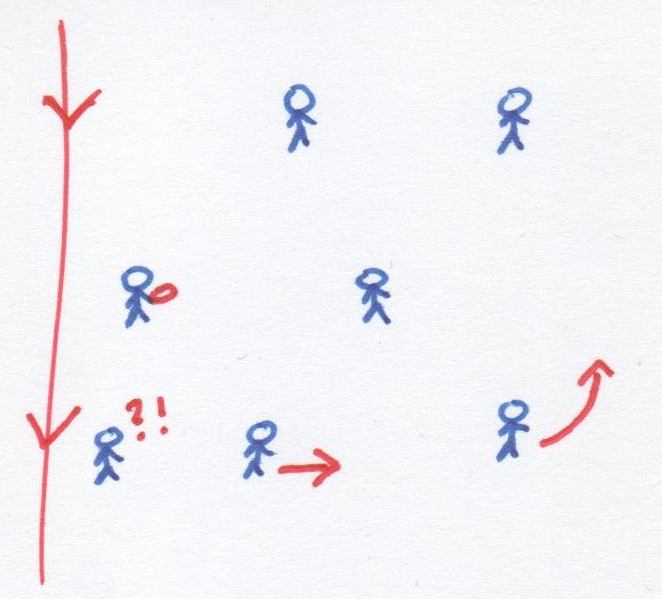 One player gets frustrated as they feel they are crowding their team mates / sideline, and they cannot find the solution.
It’s likely that a team mate several positions away from them has become disconnected from a back player (the far wing player in the diagram example), so when that player gets connected, it sets off a chain reaction which gives the crowded player enough space. It’s important to point out to the crowded player that it’s no real fault of their own – they showed good awareness by feeling uncomfortable when crowded, and the only thing they could’ve done would’ve been to try to communicate with their poorly positioned team mate. Note how in the drone footage above, the 2nd back gets disconnected from the 1st back, and this contributes to the crowding downfield.
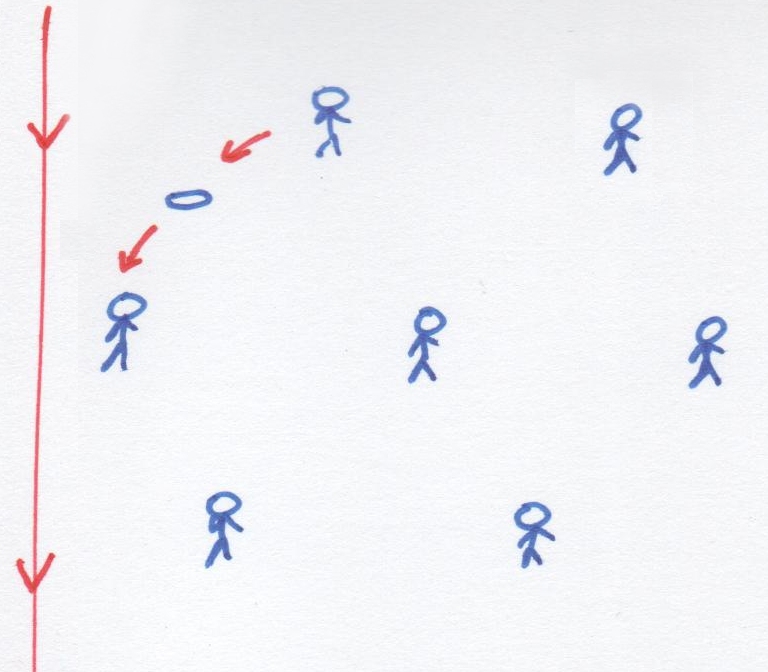 When you pass forward and to the line from a back position, you are already in a good position so don’t need to ‘clear’ downfield unless you know connected players wish to replace you. Many players have a habit of doing this, which can leave the ‘back’ positions vacant when the disc is on the sideline.
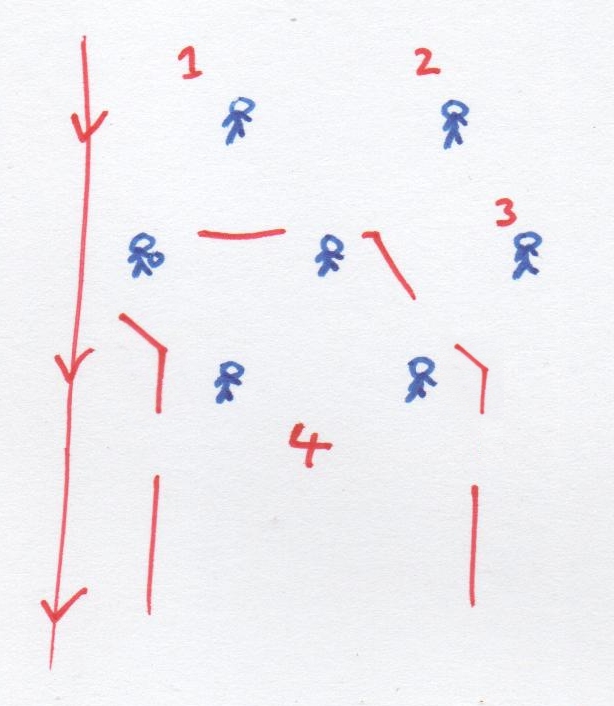 When the disc is on the line, players often fall into the trap of neglecting the 1st back, 2nd back, and far wing positions. In the diagram on the right, positions 1 / 2 / 3 are important for sustaining possession and initiating flow, however most players will gravitate to area 4 out of habit, or out of an over-desire to score.
One way of fixing this flow-breaking problem is to use a whistle to stop the game when the disc is on the sideline, and check with the players how many of the back / far wing positions are occupied or vacant, and how long it takes them to move to occupy them. When they are occupied it should be clear how many more options are available to both the thrower and the cutters.
This method involves far less talking and much more playing, so it’s particularly useful on cold days, or with teams who are receptive to going outside their comfort zone to try something new without it being fully explained. After a warm up, go immediately into Ultimate games, giving the players small focus points between each round:
2v2: Take the open pass. Players should take the open lateral pass whenever the defenders allow it, which will mean they will often be level with each other, rather than one thrower back and one cutter downfield. When а defender takes the lateral pass away, there is plenty of space for a lead pass downfield. As opposed to a cutter trying to get free of their mark downfield for a pass, the type of movement you want to encourage looks more like this:
Brighton City (White) penetrating, vs Brighton Legends (Black) at Regionals 2015.
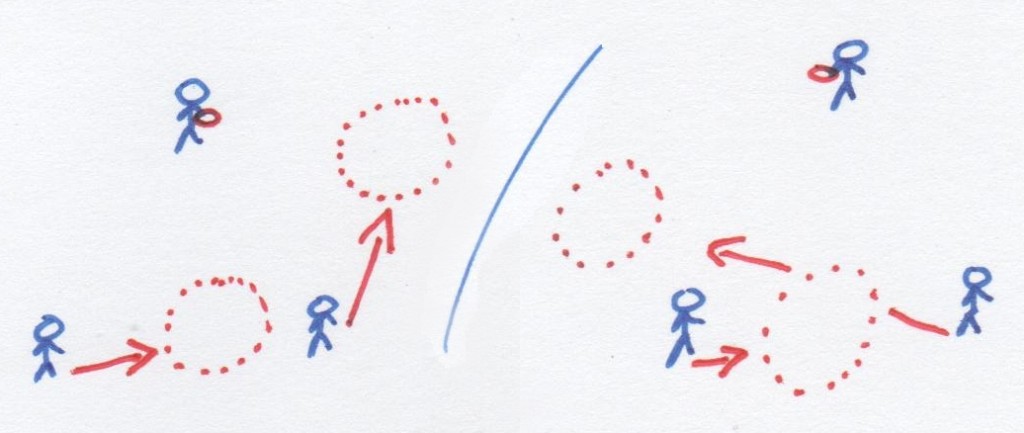
3v3: Stay connected without crowding – demonstrate what you mean by ‘connected’ (see ‘Explanation’ section on positions), and how it follows that a triangle setup is appropriate from a static disc. Demonstrate staying connected dynamically – if the other cutter cuts away from you, you should move towards them to stay connected, whereas if they cut towards/across you, you should either move away from them or towards where they came from, to avoid crowding.
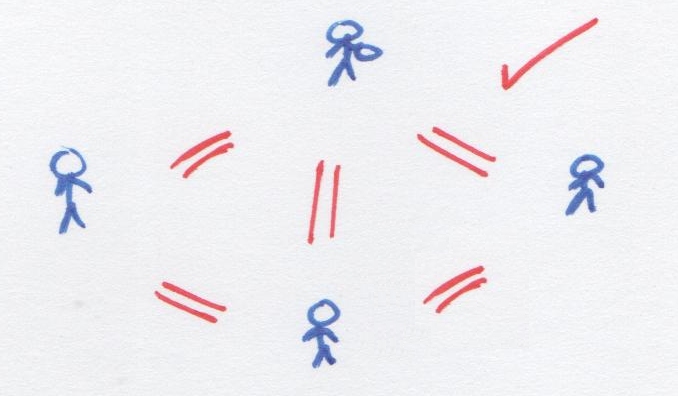
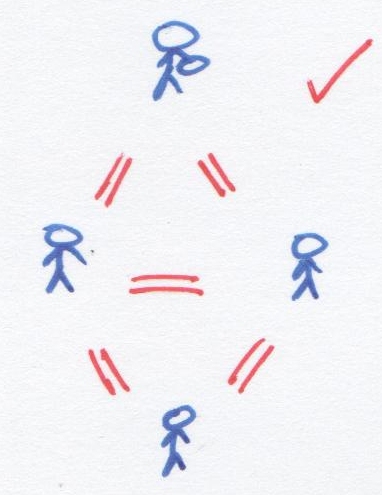 4v4: Make equilateral triangles – demonstrate the two possible shapes from a static disc, one where the thrower is part of two triangles, and another where the second triangle is further from the thrower, created by the downfield players. If in doubt, find two players and make an equilateral triangle with them.
5v5 – 7v7: Don’t surround the disc – all players should be within the field of vision of the thrower – so only 3 players should be connected to the thrower.
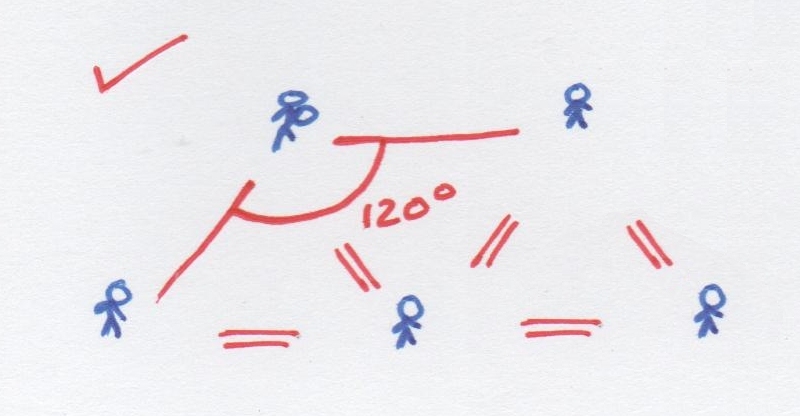 The remaining players should not set up connected to the disc, but should get connected to non-throwing players to make further triangles.
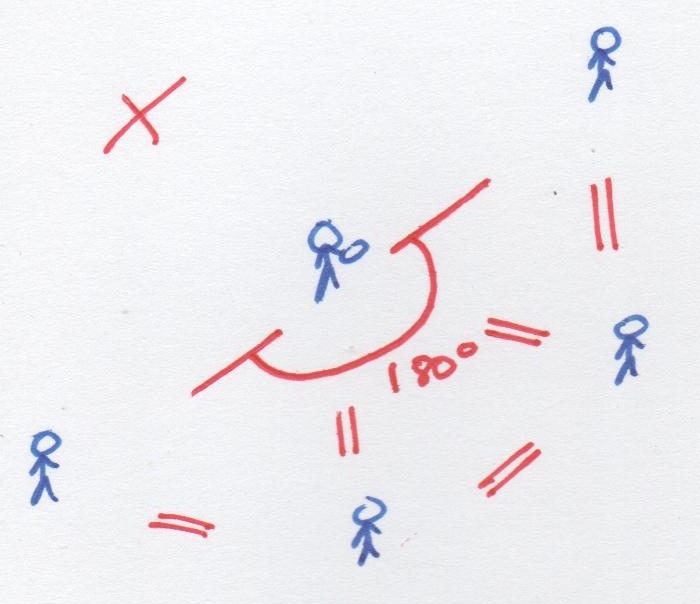 If too many players try to get connected to the thrower, the thrower becomes crowded and / or surrounded by defenders.
There are a number of drills which practice key elements of Hex offence. If players have had a go at Hex then they should be able to relate to the following drills / exercises:
Give-Go-Swill Drill
7-12 players
Focuses: Give-Go moves, Misdirection
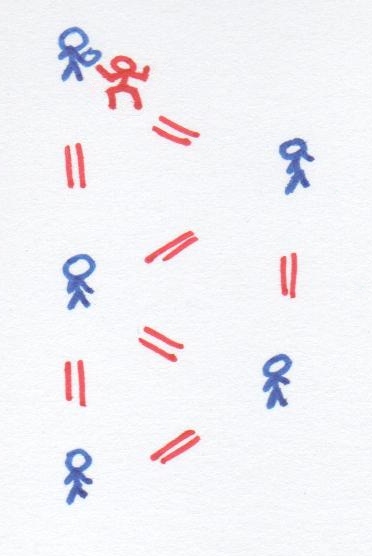 Players start as illustrated in the diagram on the left. The player at the top is the active ‘O’ player, accompanied by a defender – all other players are static. The active ‘O’ player is aiming to work the disc down to the player at the end of the drill, using at least one static player from the far side.
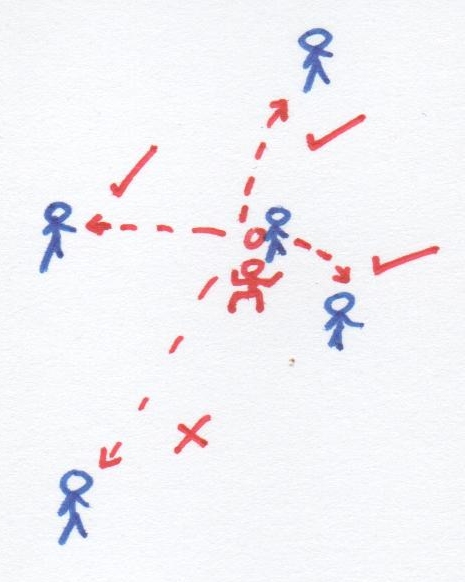 The offence is not allowed to throw to a player they are not connected to, and static players may not pass to each other.
The defender is simply trying to stop the offensive player, by containing them / going for an interception / getting a point block. When the disc reaches the furthest player, they throw a long pass back to the start, swilly enough for both the O and the D to be able to make a bid for.
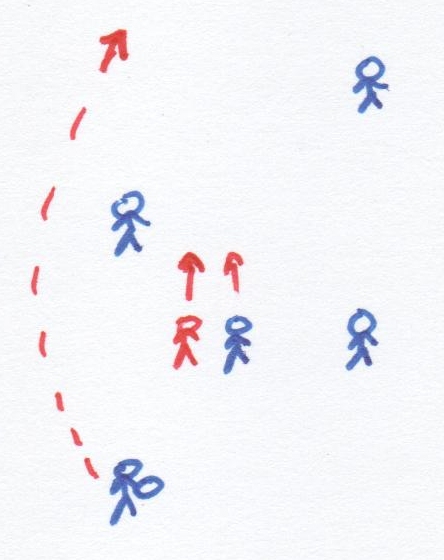 The give-go-swill drill trains misdirection, balance, and using flow and tempo to attack. Players should find that it is more effective to advance the disc through give-go moves – including moves away from the end target – than it is to directly break the force from static. Players also learn to communicate clearly with the static players about when/where they want the disc thrown back to them.
Rotation: The long thrower at the end joins the queue at the top, all the static players zig-zag down one position, the O becomes the first static player, and the defender becomes the active O player.
J-Lav running through the Give-Go-Swill drill at GB Mixed U23 2015 training
8-16 players
Focus: Sustainable possession
Mark out a box which is quite spacious – half a pitch (including end zone) is good for 7v7 – and split players equally into two teams. The aim of the exercise is for the offence to keep possession for as long as possible, playing out of the Hex setup/shape. Possession switches on a turnover as usual. Play starts / stops on the blow of a whistle, and the team in possession when play stops is awarded 1 point. 60 seconds on / 30 seconds off is quite realistic and fairly hard work – you can adjust the timings to suit what you want to achieve with your team.
Keepdisc is tough physical work and it trains sustainable possession – players must be efficient with movements or they will get too tired. It also gets players practicing fundamentals of the offence such as not surrounding the disc (this is the most common cause of turnovers in keepdisc), staying connected without crowding, & taking the open pass.
If you wish to expand on Keepdisc, consider:
– changing the play / break times
– adding an extra defender every 10-20 seconds
– adding 3 or 4 end zones of different colours around the edges of the box, after X seconds of possession then the whistle blower announces a colour – if the offence then score in the corresponding end zone, they get 2 points
Mex Puzzle Drill
6-13 players
Focuses: Communication, Creating space
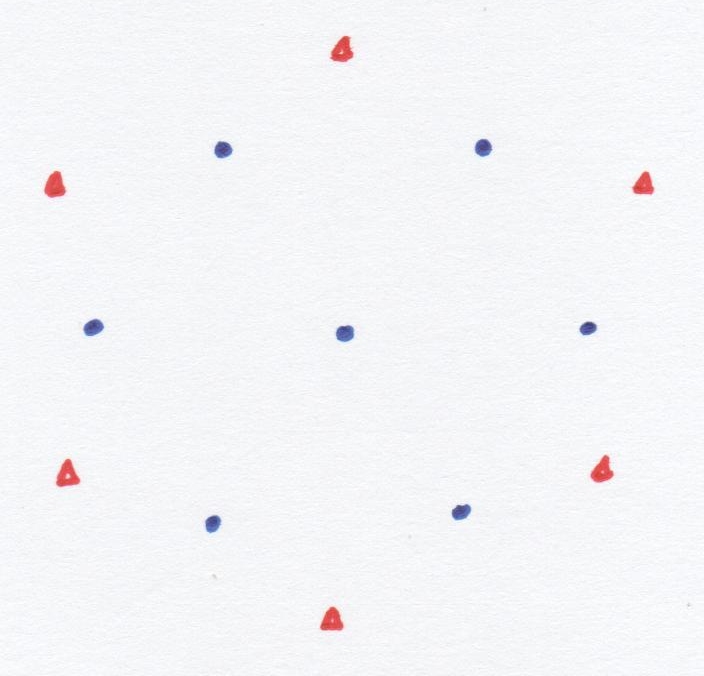 Set up 7 marker cones in a regular Hex formation, and add six ‘clearing cones’ around the outside, between the marker cones and further out from the centre. Players can cut to marker or clearing cones at any point and from anywhere in the formation, and they are allowed to hang out on the marker cones – but must continue moving if they are near a clearing cone. Passes should be made from marker cone to marker cone, hitting receivers in stride. The pass should be faked if a receiver arrives too early at a marker cone, if there are two cuts to the same cone, or if the thrower is not happy with making the pass for any other reason.
The disc starts on the edge of the formation, one player cuts to a clearing cone to create space for the first pass, and play continues for 30-60 seconds depending on your team. Players aim to keep flow by creating space for each other & keeping the disc moving. Fakes help the team keep tempo.
Mex Puzzle Drill is probably the hardest drill in the world which doesn’t involve defenders, and as such it can be frustrating – but it is great for teaching dynamic spatial awareness. Players constantly have their heads up, are looking to create space for each other and use it as they see it developing – a very valuable skill which is tricky to learn and tricky to teach.
In order to keep any kind of flow or tempo, the team must also learn to communicate constantly through vocalisation and gesticulation. This teaches them to work together as a team when playing offence, with everybody sharing the responsibility for keeping the disc alive.
Rotation: Mex Puzzle Drill can be very tiring, so regular breaks / multiple subs are recommended. Rolling subs can be waiting to be tagged in near the clearing cones, or the drill can be played in short bursts (although ideally the offence works at a rate they can sustain indefinitely).
Mex Puzzle Drill at Brighton City trials, 2015
8-13 players
Focus: Long throwing from motion, Breaking the force
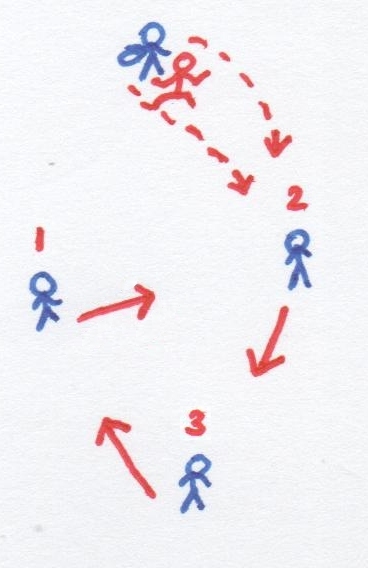 Players set up in a rhombus, first cut goes from the open to the break side, the other cutters follow the triangle rotation – break side player goes deep, deep/forward player comes under to the open side. If the break pass is thrown, the under cutter turns to go deep, and the deep cutter turns to come under.
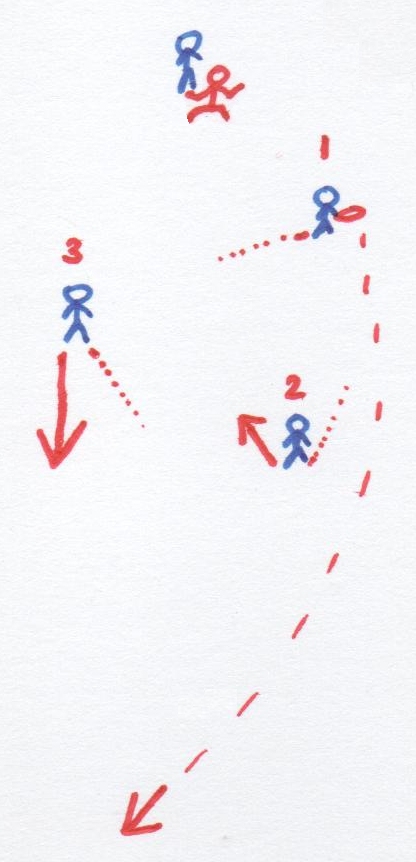 Catcher of the break pass throws long to the new deep cutter.
If the break pass is not thrown, cutters should improvise to provide a suitable backup option for the thrower – often the initial deep cutter is well placed / has good timing to come under for an open-side under pass, and then throw deep to the original break-side cutter.
If you want to expand on the Mex Huck Drill, consider adding defenders whilst also giving the cutters more freedom to choose the direction of rotation of the triangle. You can also change which cutter initiates the movement downfield – these modifications prevent players from simply ‘running through the motions’ – instead they should start with their hips facing the thrower, being ready to react to space as they see it being created. The setup/shape can also be rotated to create different angles – meaning the long thrower could receive the first pass moving towards as opposed to away from the end zone, or the disc movement could be changed to be lateral (a swinging drill) instead of downfield.
Rotation: New player becomes force, force becomes break-thrower, break-thrower becomes long thrower (starts open side), long thrower becomes deep-to-under cutter (starts deep), deep-to-under cutter becomes under-to-deep cutter (starts break side), under-to-deep cutter joins the queue.
Mex Huck Drill at City trials 2015 |
Variation – using open side if no break |
Flags
2-7 players
Focus: Identifying space, throwing skill
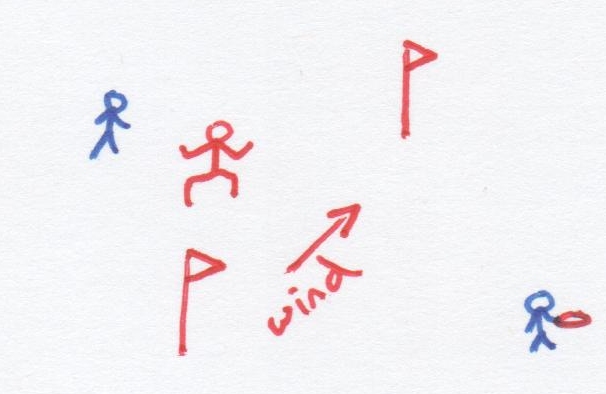 Flags is a game which will expose your weaknesses and challenge your strengths. Set out two flags (or markers) a few yards apart, one directly downwind of the other – these mark the goal line – the windier it is, the longer the goal line should be. The higher the skill of the players (and/or the lesser the wind), the narrower the goal line.
2 players: Complete throws over the goal line. Throw from where you catch.
3 players: 2v1 – If you cause a turnover, switch in as a defender. Defender’s stall is a shot clock (from anywhere on the field), which resets after a goal. All players can move freely and pass on either side of the flags, but only passes across the goal line (at any height) count as goals & reset the shot clock.
Hex offence is still very new, so there are plenty of alternative ways to train it which have yet to be discovered – the ones included in this article are some of the methods which Felix has utilised whilst coaching Hex over the last few years, but are by no means perfected or exhaustive. I recommend experimenting with new drills, exercises and games which are suited to your team’s needs – working from the Hex setup & core principles.
Good luck implementing the strategy – I hope you enjoy playing it as much as the teams and players I’ve coached do! If you have any questions, just get in touch.
For videos of full games with Hexagon offence, check out the Hexagon Ultimate YouTube and Facebook pages.
Felix is planning a UK & European Tour of workshops on Hex Ultimate in late 2016, where you can participate in drills and games with experienced Hex players (including Felix) who will be imparting their knowledge to you at all times. There will also be a classroom session where Felix will break down the core principles before progressing through to the advanced concepts of both Hex offence and Flexagon defence – why they are effective, how you can teach them, and how to excel at playing them. Join the notification list to hear about the locations / dates of the Hex Tour.
Related:
Hex offence documentation
Offences vs Defences: Training to counter your opponent effectively
Hexagon Ultimate YouTube
Hexagon Ultimate Facebook
Reddit discussion on this article


